How to Install Windows 8 in 7 Simple Steps
source of soluto.comStep 1: Ingredients
Before you can get the first taste of Windows 8, you'll need to gather the following ingredients: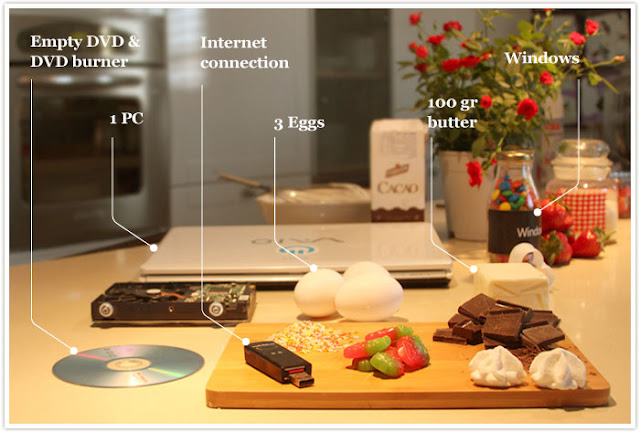
1 PC; Internet connection; 1 blank DVD; 1 DVD burner; M&Ms or candy of choice.
Step 2: Backup your Files
 Before you install Windows 8, back up all your files using Dropbox or your backup method of choice.Tip
Backup your files to Dropbox to make sure that all of your personal files, documents, and photos stay secure during your upgrade.
Step 3: Using the Windows 8 Upgrade Assistant
 Using the Windows 8 Upgrade Assistant, you'll be prompted to check for compatibility. After you click on the Download Pro link, you'll have the option to download a small “stub” installer. This little 5 MB file will run a compatibility check on your computer to tell you which programs will and won't work with Windows 8.
 When the check is complete, you'll be prompted to review and decide what to keep. Since this is a new installation, not an upgrade to Windows 8, start your Windows 8 experience fresh, without any files from your current OS.

The Upgrade Assistant will recommend the version of Windows 8 that fits your PC. Select the version that is recommended as compatible. Isn't it nice to know that there's a good match?
Step 4: Purchase
 Time to pay up. Simply fill in your billing information and select a payment method. Once payment is complete, you'll be given a product key. Make sure to write this down, you'll need it later. (Don't worry if you forget, it'll also be sent to your inbox.)

 After your order is complete, the Windows 8 download will start, and the fun begins.
------------------------------------------
Step 5: Download and Burn
A few more clicks and you'll be in the new world of Windows 8. When asked how you want to install Windows 8, we recommend you choose, “Install later by creating Media”. You'll then be asked which media to use. Here, we recommend you go with an ISO file (later, you'll burn this to the DVD.)
Save the ISO file. Once you click save, the ISO download will begin. Now you're really cooking. After the file is downloaded, insert a recordable DVD into your disc drive, and go to the location where you saved the download. Right click on the .iso file you downloaded, and then click “Burn disc image.” Check the “Verify disc after burning” check box and click "Burn".
Tip
Check the “Verify disc after burning” check box and click Burn. It may take a few minutes until the burn is completed.
It may take a few minutes until the burn is completed.
Time to make a cup of coffee (or bake a cake.)
Step 6: Starting the installation
To start the installation, put the disc containing the Windows 8 image into your computer drive. You'll be prompted to enter the product key you wrote down earlier. On the next screen, we recommend selecting “get updates” to ensure you're getting the latest version of Windows 8.
You'll need to enter the product key again and click “Next”. Aren't you glad you wrote it down?
Read the License Terms, check the “I accept” box, and press “Next”. We know this part can be boring and you'll be tempted to just accept it without reading. Most people probably skip it. But we checked with our lawyers and they told us we must tell you to read it, so please do. Thanks.
Now it's time to choose what to keep. Make your selection, and then on the next screen click “Install”. This will also take a while - time for those M&Ms (or whichever candy you chose.)
------------------------
After the install is complete, your PC will restart automatically.
-
Step 7: Personalization
Now it's time to personalize the Start screen. Choose a color and a name for your PC. If you'd rather keep it simple, select the express settings option. You can always add personal touches later.
You'll be prompted to Sign in to your PC with your Microsoft Live ID. If you already have a Microsoft Live ID account, you can enter your email address to link to your current account.
If you don't have a Microsoft Live ID account yet you can sign in without one.
After the PC is finished finalizing your settings, you'll be set to start Windows 8. Congratulations! You've installed Windows 8.
-
All Done!
Now that you've got Windows 8 we recommend that you install Soluto to make your Windows 8 experience even better (Ok, we might be a little bit biased.) With Soluto you can bring back the start button, and choose whether to boot straight into the Windows 8 start screen or stick with classic desktop mode.


Komentar
Posting Komentar